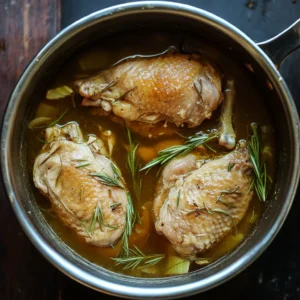
Introduction to Chicken Brining
Chicken brining is an essential step in preparing juicy and tender chicken that bursts with flavor. Whether you’re roasting, grilling, or frying, brining ensures that the meat stays moist and absorbs all the seasonings you use. Brining, at its core, involves soaking chicken in a solution of salt, sugar, and water, but there are endless ways to modify the recipe to enhance the flavor. This guide will walk you through the basics and some delicious variations of the perfect chicken brine recipe.
Why Brine Chicken?
Brining improves the flavor and texture of chicken by breaking down the muscle proteins, which allows the meat to absorb more water. This makes the chicken juicier and more tender. It also ensures that your chicken doesn’t dry out during cooking. Salt is key in this process because it causes the muscle fibers to unwind and absorb water, while sugar helps to balance the salt and add a touch of sweetness.
Basic Chicken Brine Recipe
Here’s the simplest brine recipe you can use as a base:
Ingredients:
- 8 cups cold water
- 1/4 cup kosher salt
- 1/4 cup sugar
- 4 garlic cloves, smashed
- 2 bay leaves
- 1 tablespoon black peppercorns
- 1 whole chicken (4-6 lbs)
Instructions:
- Dissolve salt and sugar: In a large stockpot, combine water, salt, and sugar. Stir over medium heat until fully dissolved.
- Add aromatics: Once dissolved, remove the pot from the heat and add garlic, bay leaves, and peppercorns.
- Cool the brine: Let the mixture cool completely to room temperature.
- Submerge the chicken: Place the chicken in the brine, ensuring it’s fully submerged.
- Refrigerate: Cover and refrigerate for 4-8 hours, depending on the size of the chicken.
- Rinse and dry: After brining, rinse the chicken under cold water and pat it dry before cooking.
Table: Chicken Brine Timing Guide
| Chicken Part | Brine Time |
|---|---|
| Chicken Breasts | 2-4 hours |
| Chicken Thighs | 4 hours |
| Whole Chicken | 6-8 hours |
| Chicken Drumsticks | 3-4 hours |
Variations of Chicken Brine Recipes
While the basic brine works wonders, you can customize it by adding various herbs, spices, and liquids. Here are some creative variations:
1. Citrus Herb Brine
Perfect for a fresh, zesty flavor.
- Ingredients: Add sliced lemons, oranges, and fresh thyme to the basic brine recipe.
- Instructions: Brine as usual, letting the citrus infuse a fresh, tangy taste into the chicken.
2. Apple Cider Brine
For a hint of sweetness and fall flavors.
- Ingredients: Replace half of the water with apple cider. Add cinnamon sticks and cloves.
- Instructions: This brine adds a sweet and spicy depth to the chicken, ideal for grilling.
3. Spicy Brine
Ideal for those who enjoy heat.
- Ingredients: Add crushed red pepper flakes and a chopped jalapeño to the basic brine.
- Instructions: Let the chicken soak for up to 6 hours for a spicy kick.
How to Cook Brined Chicken
Once your chicken has been brined, it’s ready to be cooked using a variety of methods. The most common ones are roasting, grilling, and frying. Here’s how to adjust each cooking method for brined chicken:
Roasting Brined Chicken
- Preheat the oven to 425°F (220°C).
- Roast the chicken for 15 minutes, then reduce the temperature to 375°F.
- Cook until the internal temperature reaches 165°F (74°C) in the thickest part of the chicken.
Grilling Brined Chicken
- Preheat the grill to medium-high heat.
- Grill the chicken for 6-8 minutes per side, depending on the thickness, until fully cooked.
Frying Brined Chicken
- Heat oil in a deep fryer to 350°F (175°C).
- Fry the chicken for 10-15 minutes, turning as needed, until golden and crispy.
What to Serve with Brined Chicken
Brined chicken pairs perfectly with a variety of side dishes. Here are a few serving suggestions:
- Roasted Vegetables: Roasted carrots, potatoes, and Brussels sprouts.
- Mashed Potatoes: Creamy, buttery mashed potatoes.
- Fresh Salad: A simple green salad with a lemon vinaigrette.
- Macaroni and Cheese: Creamy, baked macaroni and cheese is always a crowd-pleaser.
Conclusion
Brining is a simple but transformative technique that guarantees moist, flavorful chicken every time. With just a few basic ingredients, you can drastically improve the texture and taste of your chicken, no matter how you choose to cook it. Experiment with different brine variations to suit your tastes, and don’t forget to serve your brined chicken with your favorite side dishes for a complete meal.
FAQs About Chicken Brining
Q1: How long should I brine my chicken?
Brine chicken breasts and smaller cuts for 2-4 hours, and whole chickens for up to 8 hours.
Q2: Can I over-brine chicken?
Yes, over-brining can cause the chicken to become too salty and soft. Stick to the recommended brine times.
Q3: Should I rinse the chicken after brining?
Yes, rinse the chicken under cold water to remove excess salt before cooking.
Q4: Can I use table salt in brine?
It’s best to use kosher salt, as table salt has smaller granules and could make the chicken too salty.
Q5: Can I freeze brined chicken?
Yes, after brining and rinsing, you can freeze the chicken. Be sure to store it properly in an airtight container.
For more tips on brining chicken, check out (Dinner, then Dessert)
ps://dinnerthendessert.com/chicken-brine/).